Why I Chose an SBIG ST-4000XMC Camera.
The SBIG ST-7XME that I used for 8 years:
I happily used an ST-7XME camera from
Feb 2002 through May 2010. I equipped it with a CFW-8 filter
wheel so that I could do LRGB imaging. I originally bought an
"ST-7" camera then later upgraded it to an ST-7XME. My "ST-7XME"
camera contains two imaging chips, a 765x510 pixel black-and-white main
imaging chip and an 192x164 pixel TC211 guide chip. (SBIG's site
currently shows the current version of the ST-7XME having a 657 x 495
pixel imaging chip of dimensions 4.9 x 3.7mm. The imaging chip
has shrunk over time apparently from the one in my version which is 765
x 510 pixels with dimensions 6.9 x 4.6 mm?) Main advantage of the
ST-7XME camera is that it is half the cost of the ST-4000XCM. But
by the time you also buy the filter wheel that is necessary, this
advantage is diminished somewhat...
There were many times that I had difficulty locating a guide star on
that tiny guide chip. I use Megastar to show me the overlay boxes
of the two chips against the star background and was often able to
rotate the camera to get a good guide star within the guide chip's
frame. Rather tedious at times to actually get a decent guide
star in the guide-frame... Often cost me a lot of time.
To do LRGB imaging, you have to take images through each of the
Red, Green, Blue, and Luminance (clear) filters. The filters
cover both the guide chip and the imaging chip. So I might set up
autoguiding on a blue star using the clear filter. Everything
would be fine until the filter changed to red. Then the guide
star would become much dimmer and I might lose tracking! Very
annoying. If I could maintain tracking then I would take
something like 10 images through the clear filter (luminance images),
10 through the red filter, 10 through the green filter, and 10 through
the blue filter. Then I would have to align and stack all the
luminance images, align and stack all the red images, align and stack
all the green images, and align and stack all the blue images.
That process would yield one luminance image, one red image, one green
image and one blue image. I would then combine those to yield a
color image. However, I often encountered problems in that the 4
filters might not have exactly the same thickness! This causes
some of the images to be out of focus due to
Snell's
law as seen here. Focus is also affected as the temperature
goes down at night. Most telescopes shrink as they get
colder. Some actually lengthen (e.g., Takahashi TOA-130)
Overall, LRGB imaging is a tedious process often requiring re-shooting
and reworking of images. However, this process allows maximum
flexibility and maximum quantum efficiency of the imaging chip
Considerations regarding purchase of a new camera:
1. I have really liked having the
guide chip in the same camera package as the imaging chip.
a. You don't need a piggy-back
guide scope
b. You only need to focus one telescope
c. No "differential flexure" problems where the two scopes don't
stay aligned...
c. So I was pretty sure I wanted to continue having a camera with
the guide-chip built-in.
2. I really wanted a larger guide
chip though to simplify finding a guide star.
3. I wanted a larger imaging chip. The little 765 x 510
pixel, 6.9 x 4.6 mm imaging chip always felt VERY TINY compared to the
35 mm film I originally used for astrophotography.
4. I was really worried that I would be giving up something
important to me if I went to a "single-shot" CCD imaging chip instead
of a black-and-white chip using filters.
5. However all the reshooting, problems with losing the guide
star, individual focusing required for various filters, etc., made me
sometimes wish I could go back to film (Not really! CCD has no
reciprocity failure! Effectively MUCH more sensitive than
film! No delay waiting for slides to return from processing
labs! Etc.!)
6. Then I thought "Darn, I'm getting too old to spend so much
time trying to acquire decent images." I almost NEVER could get
my stars to come out without color fringing due to different blooming
star radii effects of the R G and B images. Wasted LOTS of time
on guide star acquisition, reshooting, and other LRGB post-processing.
So I researched the possible SBIG
cameras with larger imaging surfaces and larger guide-chips built-in.
I finally concluded that the ST-4000XME seemed to be the right camera
for me.
The SBIG ST-4000XCM Camera:
I purchased the camera from
Astronomics.com which is where I have bought everything over the
years. They said it was back-ordered but it showed up at my door
in
less than 2 weeks! Have always had great service from Astronomics.
I was still concerned though regarding the sensitivity of the camera
since the imaging chip, instead of being a normal black and white
sensor matrix is a normal black and white sensor matrix overlayed with
a "Bayer Mask", i.e., tiny R G B filters that overlay the sensor
matrix. These look something like this:

So it is like having your color filters permanently in place.
That is why these types of chips cannot equal the sensitivity (quantum
efficiency) of pure black-and-white chips that do not have a permanent
color mask layer.
There are sophisticated techniques for creating a full-color image from
an image resulting from the masked matrix:
http://www.unc.edu/~rjean/demosaicing/demosaicing.pdf
The trade-off in quantum efficiency according to SBIG is shown here:
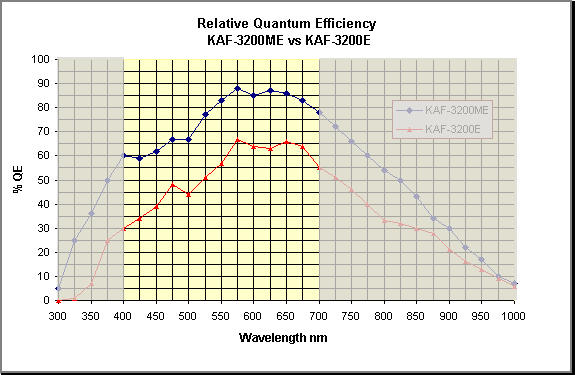
So apparently, the KAF-3200ME chip that does not have a bayer mask
achieves about 86% Red , 80% Green and 67% Blue quantum efficiencies
whereas the chip in the ST-4000XCM that is covered with the Bayer mask
achieves only 39% Red, 42% Green, and 45% Blue quantum
efficiencies. So we are giving up some intrinsic sensitivity for
non-filtered images. About half the sensitivity. For color
images, the KAF-3200ME chip will have to be covered by Red, Green, and
Blue filters respectively to get the color data. The best filters
now transmit nearly 100 percent of the Red, Green, or Blue data so the
KAF-3200ME even filtered will continue to achieve sensitivity about
twice that of the ST-4000XCM's chip.
So that means that my exposure times will need to be twice as long as
they would be for someone using a KAF-3200 chip. HOWEVER,a person
using a KAF-3200 chip will have to take 4 images (L, R, G and B) for
every 1 image (single shot full color) I take. So, I'm thinking
that "time is on my side." It will take the KAF-3200 user twice
as long to get all the frames needed to build an equivalent image -
plus he has to do all the drudgery of registering, stacking, combining
those images... I just select "Convert Color" in Maxim DL to run
the "demosaic" routine to produce a color image from my raw image.
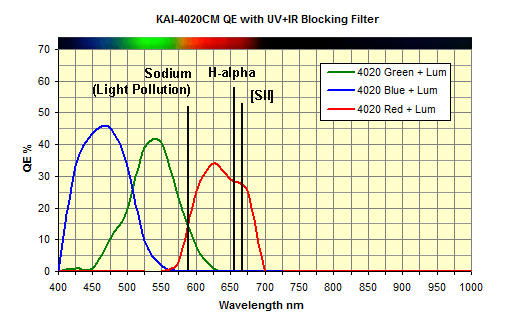
In addition, the Bayer matrix filters (on the imaging chip) have the
following characteristics:

Note that the filters seem to be specifically designed to minimize
reception of
the Sodium lines, one of the major light-pollution sources. This
greatly aids in the ability to pull deep-sky images out of a
light-polluted sky such as the one over my back yard... Objects
that I thought were impossible from my back yard are now relatively
easily obtained. (Of course one can do better in dark-sky country
but the images I am getting in my back yard so far are as good or
better than images I have previously obtained, using other cameras,
from extremely dark-sky locations.)
Puzzle I had to solve at 2:00 AM:
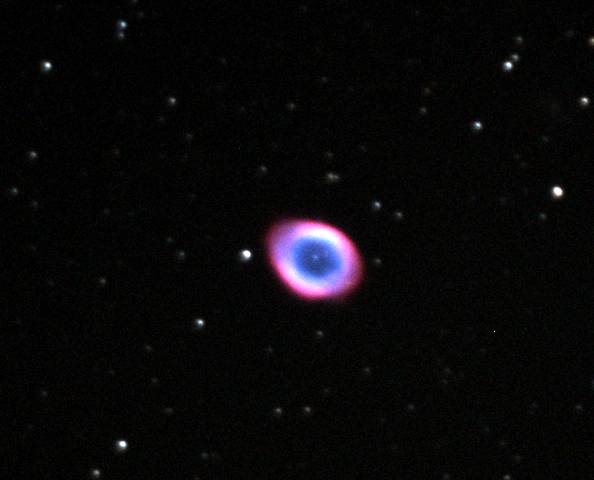
One of the first images from my back
yard using a 10" f/6.3 Meade scope was of M57. After "Convert
Color" I got the following image (cropped here to just include the
object):
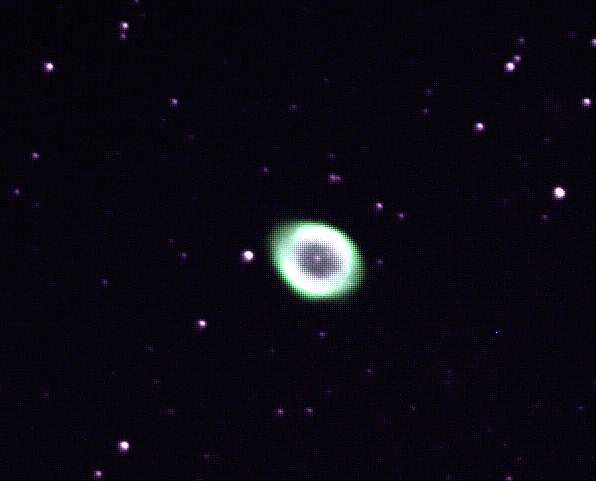
I thought "why is the outer rim of M57 green? It is supposed to
be red!
It was not until the next night when I had taken a pretty good image of
the Trifid nebula that I figured out what was happening. The main
part of the Trifid nebula is supposed to be red. My image, after
applying "Convert Color" came out green! Arrrrgh! What was
wrong?
So I used Maxim DL's "Split Tricolor" to create red, green and blue
images. Since I was familiar with what these three should look
like, I realized that the red and green images had somehow been
interchanged! I could correct the problem by recombining and
swapping the red and green images in the Combine Color function.
Seemed like a lot of extra work if I ALWAYS would have to do
this.
Downloaded latest version of Maxim DL and installed it. No
change. Red and green were still reversed.
Then I stumbled upon (it was 2:00 AM - stumbling time for me, a morning
person) a rather obscure piece of documentation in Maxim DL
regarding "Convert Color" that said:
"The X Offset and
Y
Offset selections are used to correct for any misalignment of
the color
mask in the CCD camera. Normally these are turned off.
If the converted images exhibit an obvious color imbalance, try
selecting different combinations of these two options."
What? My chip might have a "misaligned color mask?" New
camera and they screwed up the chip? Or is this normal chip
manufacturing toss of the dice? How could they misalign the mask?
Anyway, "try selecting different combinations" sounded pretty
iffy...
However, when I set X offset to 1 the colors were now correct!
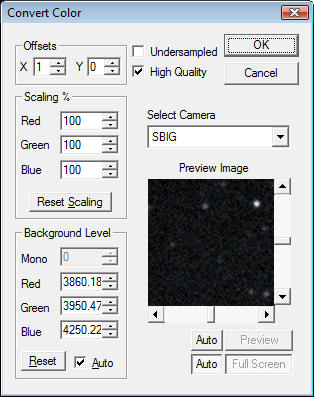
and resulted in the following:
Needed further processing but the colors were now correct!
After that, then I reran Convert Color on my Trifid (M20) image and,
after additional processing, obtained this from my heavily light
polluted back yard:

Best image I've ever taken of this object. Better than when I
have been out in really dark-sky country!
I'm sold! I'm happy!
Can't wait to get out to dark-sky country to see how much better my
images will be!
However, it is great to be able to do some of this from home!
Copyright 2010
Howard C. Anderson
RETURN TO
HOME PAGE